We’ve all had those days when our to- do list seems endless and that was before we had an Excel checklist template. In the old days, we had whiteboards and sticky notes as our aids; we’ve since moved on to smarter methods to create a prioritized to-do list.
One of the earliest and most basic options for creating a to-do list was Microsoft Excel. In this article, we’ll walk you through how to make a list in excel, and introduce you to a flexible alternative— monday.com Work OS.
We’ll also look at an alternative option — monday.com Work OS — to see if we’re any better or faster.
What is the function of an Excel checklist template?
When you find yourself juggling multiple items in your head, it’s incredibly difficult to assign priority to the tasks. A to-do list’s purpose is to make sense of this information.
The simple—and outdated—solution is to put pen to paper and then decide the order you should tackle each task. You check each off as you go, and then the note usually gets tossed in the bin.
There are some clear downfalls here:
1) If you assign the wrong priority to an item, all of these changes will result in some pretty messy paper and leaves literal room for notes, changes, and more.
2) Once you’ve crumpled the to-do list, you have no record of progress made against the list.
3) It’s very difficult to share this list with others in a professional setting.
The world is your to-do list oyster— there is a wide array of apps and software out there who’s aim is to help you organize your to-do list in a way that works for you.
Microsoft Excel is just one of them and it’s sometimes favored because:
- It’s a familiar software, so almost anybody who has used Microsoft Office will be able to create a to-do list easily
- Anyone can access an Excel list template and use features like conditional formatting that combine with reporting tools such as charts and matrices. Pivot tables can be used to customize data if required.
Let’s get building.
How to create a simple to-do list in Excel
This whole process revolves around using Excel’s Filter feature to create an editable, trackable list that you can format according to your preference.
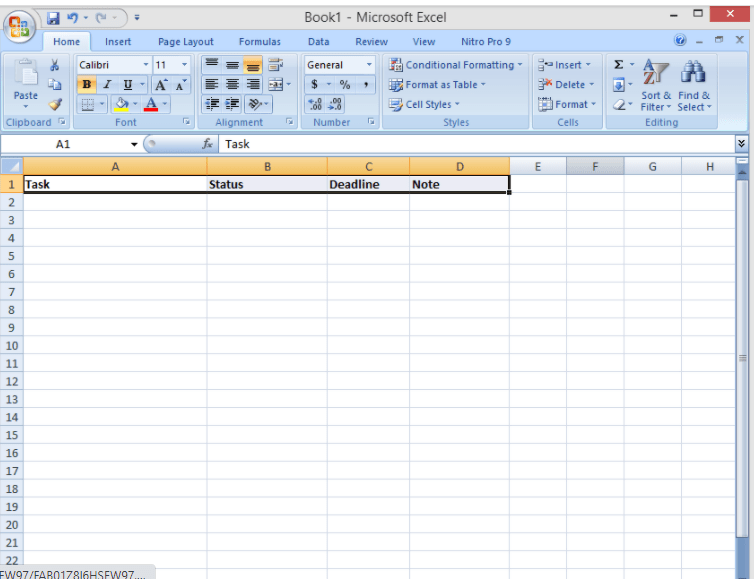
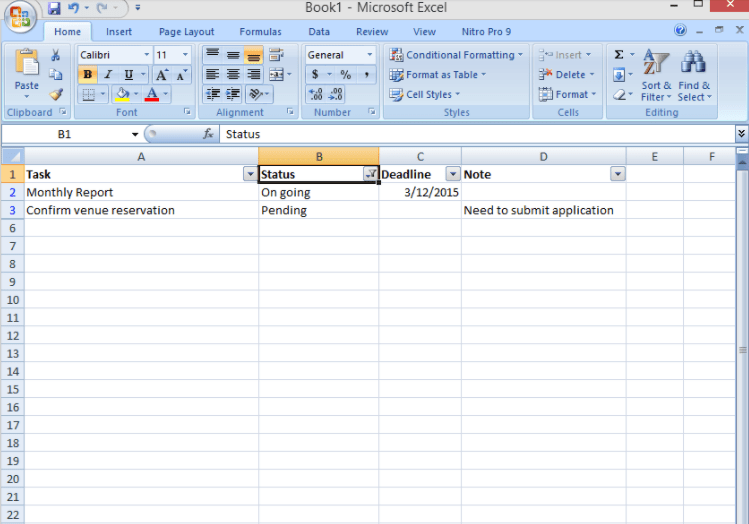
Step 1: open Excel and add column headers
Open a new Excel spreadsheet and enter new column headers.
I’ve added the following:
- Task name
- Status
- Deadline
- Note
You could add additional columns as needed such as budget, owner, tools, etc.
Step 2: fill in task details.
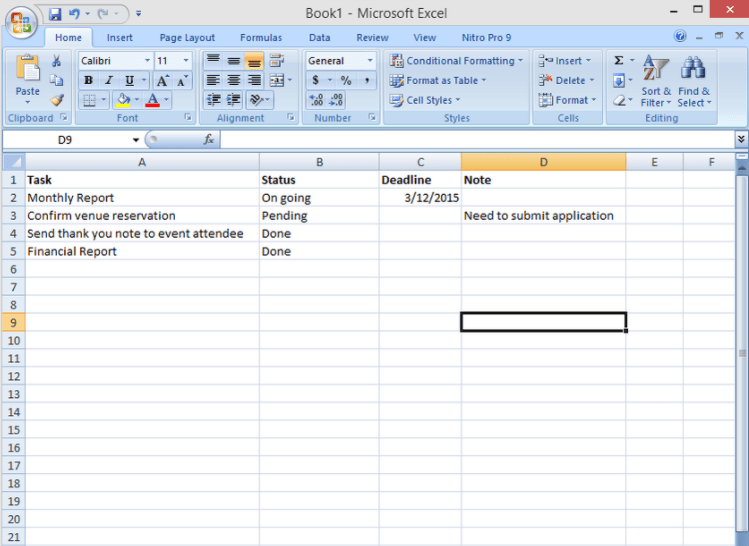
Add your tasks in the column, the status of each, and a deadline.
In the table below you’ll find:
- Monthly report — ongoing
- Confirm venue reservation — pending
- Send thank you note to event attendee — done
- Financial report — done
Note that you must fill out the tasks and status columns so that the filter can be applied. The other fields can be filled out at a later stage.
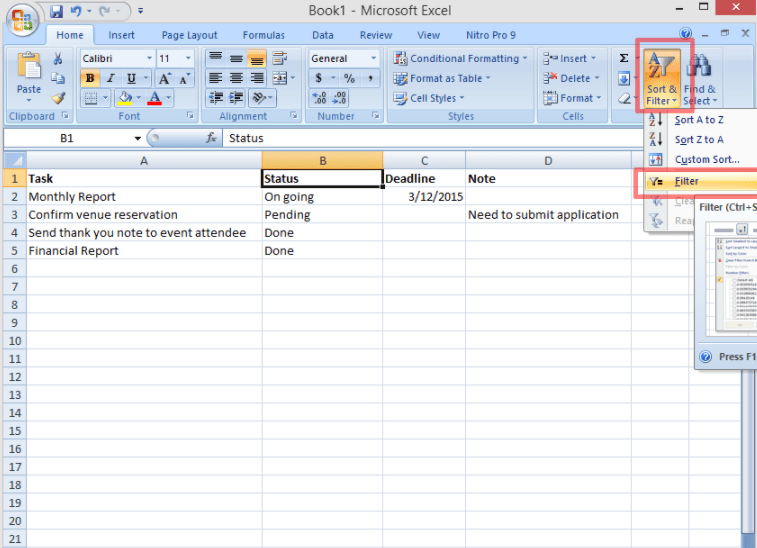
Step 3: apply a filter to your list.
To add a filter to your list, simply click on one of the headers and select Filter under the Sort & Filter icon on the top right corner of your Taskbar.
Once you save the file, Excel will remember this and the filter will be there the next time you open the file.
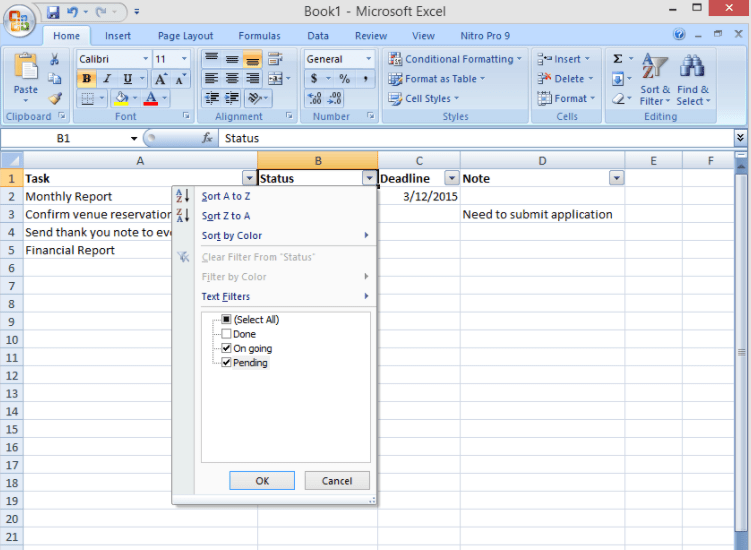
Step 4: sort your tasks using the filter.
You’ll now be able to see tiny arrows on the headers of your column.
Click on the arrow to sort your tasks by status. You can select or deselect options to see lists of…
- Your pending tasks
- Your ongoing tasks
- Completed tasks
- Any combination of these
Step 5: done!
We’ve created a simple Excel to-do list that can help you keep track of all your tasks.
You can edit fields, add as many columns as you want, or add custom colors and fonts to make it reflect your needs.
We recommend something different, however.
If you just want a basic, free (if you already have Microsoft Office) way to organize and manage your day-to-day life, Excel is fine.
The advent of project management software has enabled us to get creative, whether you want to build a simple daily or monthly to-do list, or if you prefer sortable, drop-down lists.
Despite being more complicated than it should be, it does the job. And it’s free — if you have Microsoft Office.
When you’re working on even slightly more complicated tasks or projects, you’ll find that you need additional features to manage your master list.
You’ll need the ability to, at the very least, share tasks with other people. You’ll need to add due dates, visualize your progress, upload project information and share files easily and communicate with your team.
For all of these and more, you’ll need a versatile task management software that can help you juggle multiple to-do lists with ease and convenience.
monday.com Work OS is a visual workflow platform that helps teams manage and track any kind of work in a single place.
Here’s how you can create a to-do list on monday.com.
Step 1: Create a board
A board is a central location to organize your work, in this case, your to-do list.
Step 2: Choose one of our pre-loaded templates
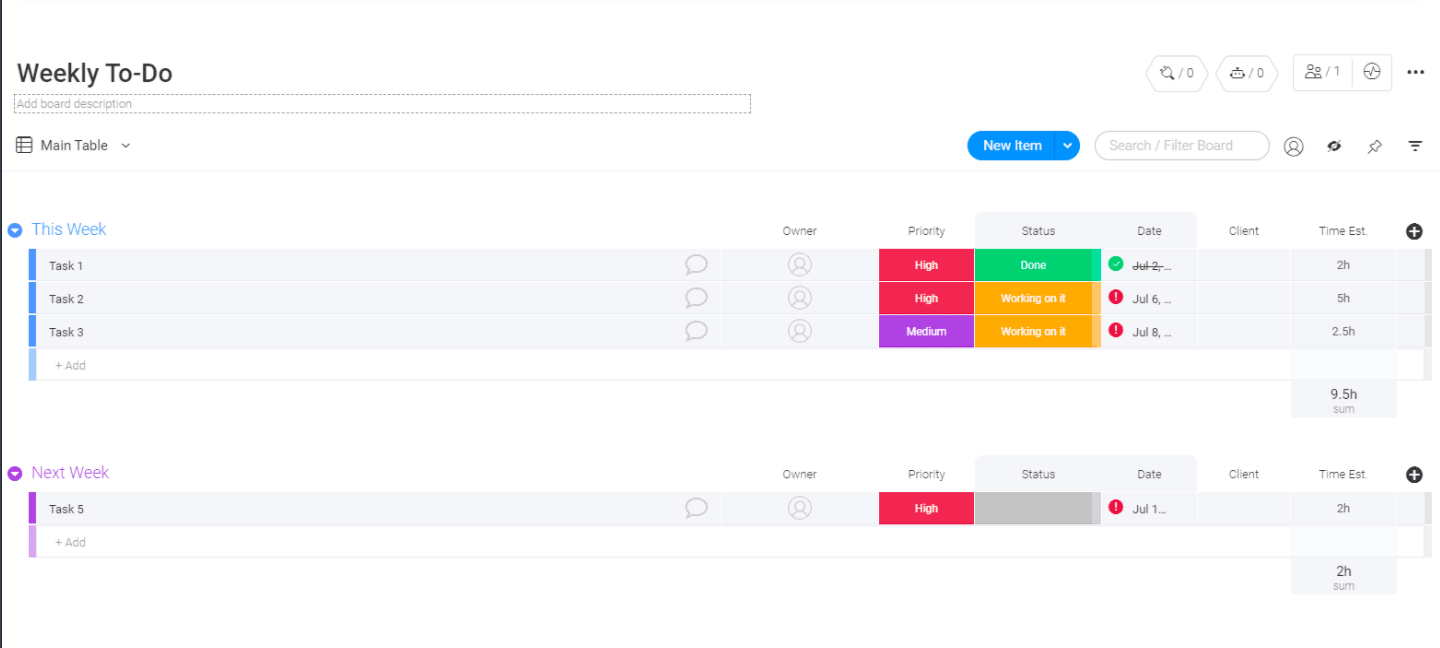
For a to-do list, we have the “weekly to-do list” template, as well as hundreds of other customizable options to choose from.
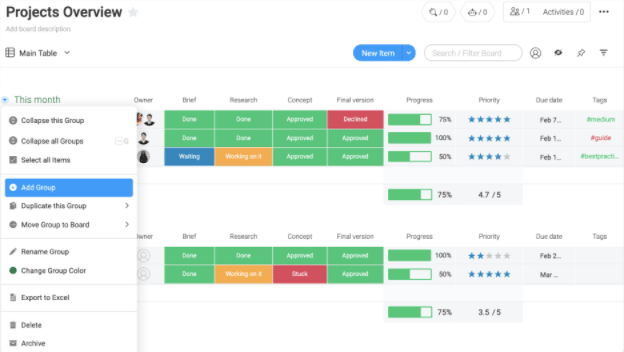
Step 3: Create your groups
Each board consists of groups that can indicate different phases of a project, whether it’s weekly iterations or interview processes.
Step 4: Add your columns.
This can include options such as task, owner, deadline, status update, dates, rating, or tags.
Step 5: Add your list of tasks on your board.
Simply assign tasks, update information and collaborate with team members — all within the same space.
It only takes a few clicks to get started with the easy and intuitive system. Once you visualize your workload with monday.com’s stellar features, we promise you won’t go back.
Here are just a few advantages of using the monday.com Work OS to-do list functionality:
- The drag and drop functionality makes it super easy to organize your daily tasks
- Communicate and collaborate better with your team by adding comments, sharing updates, and uploading documents in real-time
- Visually track your progress and manage your team with a bird’s eye view
- Automatically notify the next person responsible when a stage of a project is completed.
- Make your workflow seamless with dozens of integrations with commonly-used apps and tools.
Check out our weekly to-do list template to get started.
How to import from Excel to monday.com Work OS
If you’ve decided to make the switch to monday.com, you’ve made a great choice!
It easy to get started and transfer your Excel data to monday.com Work OS:
Step 1:
Click your profile picture on monday.com Work OS and select Import data, then Excel:
Step 2:
Drag and drop your file into the screen (or browse and select it from your computer). You’ll see a dialog box notifying you that it’s done.
Step 3:
Select the row in your spreadsheet that will serve as the headings for your new board. Click Next.
Step 4:
Select the column in your file which will be the first column on your new board. Click Next.
Step 5:
If you need to, you can change the Column type by clicking the drop-down menu on each column.
Initially, you can import columns as status, number, date, email, or text column. You can update this only after you import your data.
Click Create Board.
You should now see your Excel data imported to the Work OS.
You’ve got some thinking to do
You can see that Excel can be a basic tool for task management that doesn’t require much complexity or collaboration.
In contrast, monday.com can really make a difference when you want a more dynamic and intuitive experience across teams and priorities.
Whether your project or team is big or small — or anything in between — monday.com makes managing your task list an absolute breeze.So go on, give the Work OS a go, you’ll not only have an Excel checklist template, but much, much more.
