
Your team just spent three hours in a meeting trying to figure out why the new client onboarding process keeps breaking down. Marketing says they hand off leads properly, sales insists they’re following the right steps, and customer success points to missing information.
Everyone’s doing their part, but somehow prospects are falling through cracks nobody can identify.
This scenario plays out daily across organizations where critical workflows exist only in people’s heads. A process map changes that by creating a visual blueprint of how work actually flows through your business. It shows every step, decision point, and handoff required to complete specific workflows from start to finish. More importantly, it reveals the invisible gaps between what you think happens and what really happens.
You’ll learn which type of process map fits your situation, how to build documentation teams actually use, and how to turn static diagrams into operational improvements. By connecting your maps to a central work platform, you can build systems that evolve as your business changes.
Try monday work managementKey takeaways
- Start with broken processes to build momentum: Map workflows that already cause pain points first — teams embrace change faster when they see immediate relief from daily frustrations.
- Transform static maps into living workflows: The most effective process documentation becomes an executable workflow with real-time tracking, automated handoffs, and AI-powered optimization suggestions.
- Focus on cross-functional visibility over perfection: Document how work actually flows between departments, not how you think it should — transparency eliminates finger-pointing and speeds decision-making.
- Choose swimlane maps for complex handoffs: Organize activities by department or role to reveal exactly where delays happen and who owns each step in multi-team processes.
- Build measurement into your process design: Embed cycle time, error rates, and throughput metrics directly into workflows so you can track improvements and spot new optimization opportunities.
What is a process map and why are they essential for scaling teams?
A process map shows how work actually moves through your organization. It captures every step, decision, and handoff needed to get work from start to finish. Think of it as a blueprint that captures the sequence of activities, who’s responsible for each step, and how information moves between teams.
Process maps transform abstract workflows into concrete, visual documentation. They reveal how work actually happens — not just how you think it happens. This visibility becomes essential when you’re scaling operations, implementing new systems, or identifying where processes break down.
For organizations managing complex, cross-departmental workflows, process maps serve as operational infrastructure. They create a shared understanding of how work flows, reduce dependency on tribal knowledge, and provide the foundation for automation and continuous improvement.
Process map vs. flowchart vs. journey map
While these visualization methods share similarities, each serves a distinct purpose in documenting and improving business operations. Knowing which visualization method to use saves you from documenting the wrong thing.
Process maps dig deeper than flowcharts — they show what happens, who does it, when, and what resources you need. Journey maps focus on the external experience, while process maps document internal operations.
Signs your organization needs process mapping
Most teams don’t see their inefficiencies until something breaks. If you’re seeing these signs, it’s time to map your processes.
Recognizing these symptoms early helps you address operational challenges before they escalate into major business disruptions:
- Inconsistent execution: Different teams complete the same process using entirely different methods, creating unpredictable results and quality variations
- Knowledge bottlenecks: Critical processes depend on specific individuals, and when they’re unavailable, work stalls or mistakes multiply
- Onboarding struggles: New employees take months to reach productivity because processes exist only in people’s heads rather than documented systems
- Compliance gaps: You lack clear audit trails for critical decisions, creating vulnerability during regulatory reviews or quality assessments
- Hidden delays: Work mysteriously slows between departments, but nobody can pinpoint exactly where or why the bottlenecks occur
5 top benefits of process mapping
Process mapping delivers measurable improvements across your organization by converting invisible workflows into manageable, optimizable systems, enabling continuous improvement. The more processes you map, the clearer your entire operation becomes.
1. Create transparency across departments
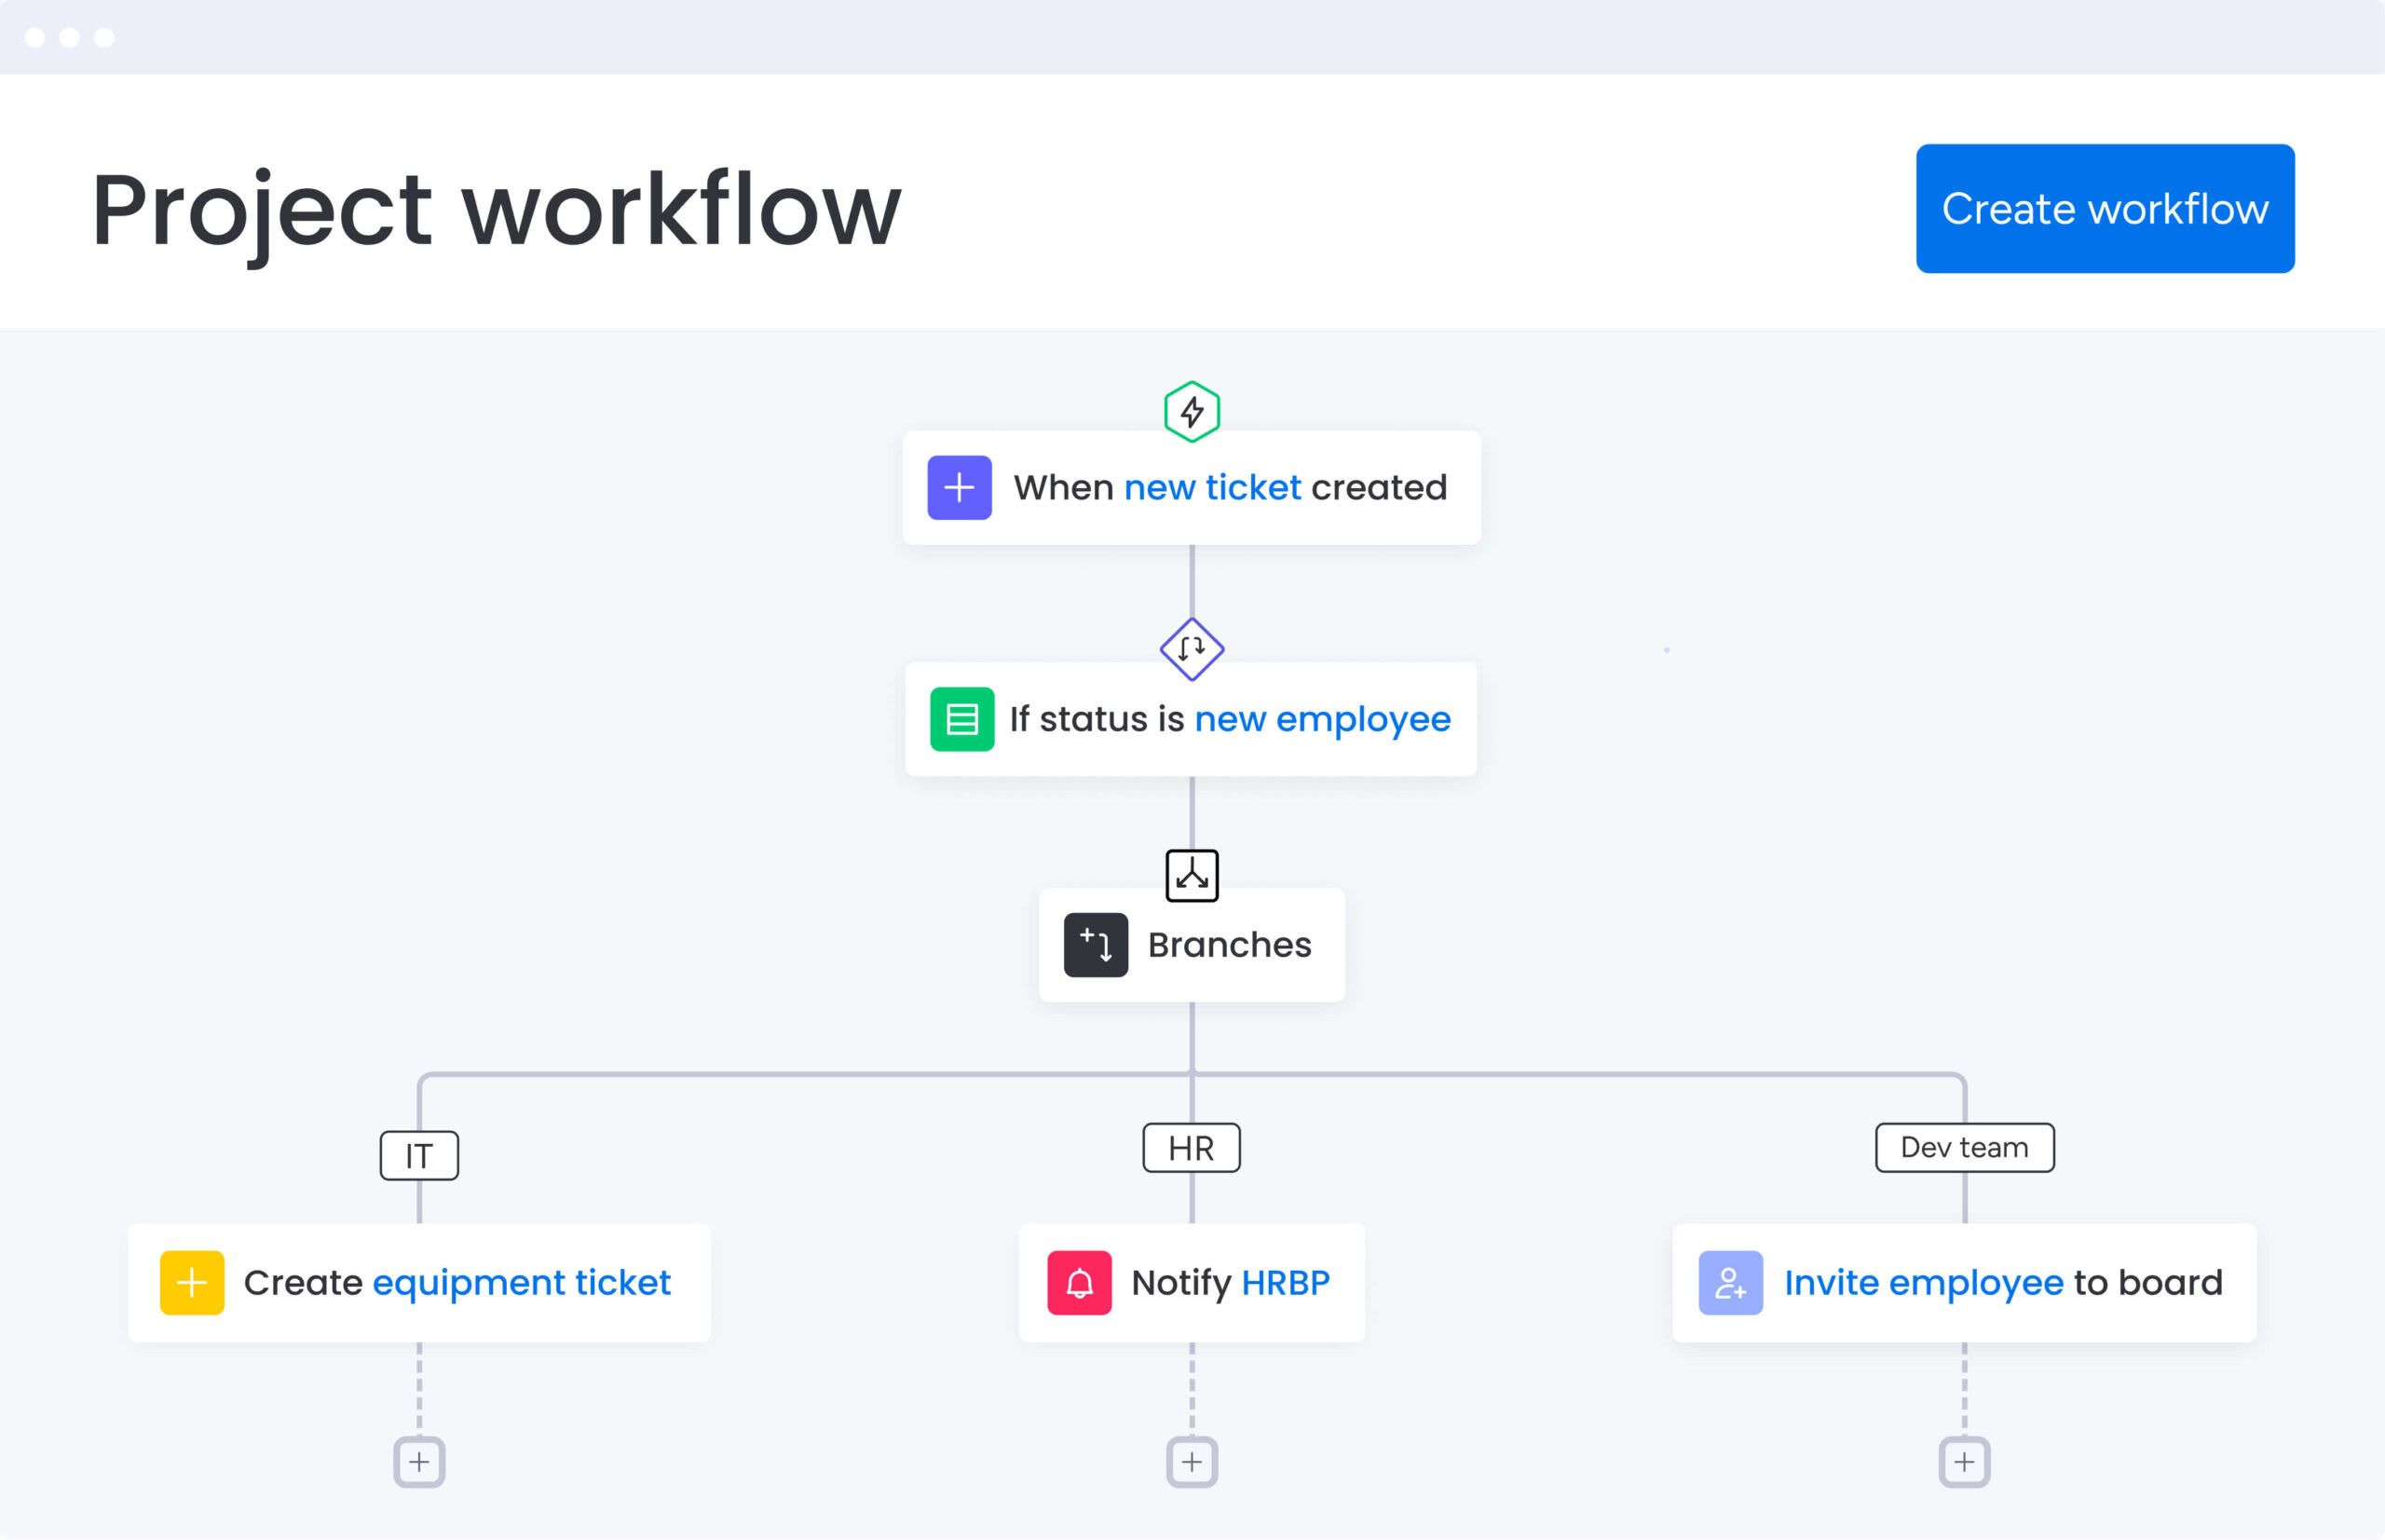
Process maps show exactly how work moves between departments. When marketing hands off a campaign to sales, or when IT receives a service request from HR, everyone understands exactly what happens next. When everyone can see the handoffs, there’s less finger-pointing and clearer accountability.
Teams using monday work management can visualize these handoffs in real-time, with automated notifications triggering when work moves between departments. The platform transforms static process documentation into living workflows where transparency is built into daily execution.
2. Accelerate decision-making
Leaders make more informed decisions when they understand how work actually flows. Process maps provide that context by showing how changes ripple through the organization. Before restructuring a department or changing a policy, you can trace the downstream impacts and adjust accordingly.
This matters most when you’re growing fast or going through major changes. Instead of making decisions based on assumptions, you’re working from a documented understanding of current operations.
3. Build a foundation for automation
Automation fails when you try to digitize broken processes. Process mapping forces you to define each step, decision rule, and data requirement before implementing technology. This prep work is why some automations stick and others fail.
Key automation preparation areas include:
- Identify automation candidates: Spot repetitive, rule-based activities perfect for automation
- Define clear triggers: Document what initiates each automated action
- Map data flows: Understand what information needs to move between systems
- Plan exception handling: Define how edge cases and errors get resolved
4. Reduce operational costs
When you can see your workflows, the waste becomes obvious. You might discover three different approval layers for routine purchases, or find teams duplicating data entry across disconnected systems. Every inefficiency you cut saves real money — less time wasted, faster delivery.
5. Enable continuous improvement
Process maps show you where you’re starting from. Once you know how long each step takes, where errors occur, and what resources are consumed, you can systematically improve. Teams can test process variations, measure the impact, and roll out proven enhancements across the organization.
7 types of process maps for different business needs
Pick your mapping approach based on what you’re documenting, who needs to use it, and how complex the workflow is. Each type works best in different scenarios.
1. Basic process flow maps
Basic flow maps show sequential steps from start to finish using standard symbols. They work best for straightforward procedures with minimal decision points. Think employee expense reimbursement or simple approval workflows. They’re light on detail, which makes them perfect for training and quick reference.
2. Swimlane process maps
Swimlane maps organize activities into horizontal or vertical lanes based on who performs them. Each department, role, or system gets its own lane, making handoffs and responsibilities explicit and easy to track. This format shows exactly where delays happen and who’s responsible for each step.
Organizations using monday work management can create digital swimlanes where each department works in their designated space while maintaining visibility into the complete workflow. Handoffs trigger automatic notifications, eliminating the confusion that often occurs at transition points.
3. Value stream maps
Value stream mapping focuses on the flow of materials and information needed to deliver value to customers. This Lean methodology distinguishes between value-adding activities and waste. In healthcare settings, value stream mapping has demonstrated measurable results, with one ophthalmology clinic achieving a 43.9% reduction in lead time and an 89% decrease in waiting time. Manufacturing teams use them to optimize production lines, while service organizations apply them to customer delivery processes.
4. SIPOC diagrams
SIPOC (Suppliers, Inputs, Process, Outputs, Customers) diagrams provide a high-level process overview without getting lost in details. They define process boundaries by identifying what feeds into the workflow and what it produces. This makes them ideal for scoping improvement projects and aligning stakeholders on what’s included.
5. Detailed process maps
Detailed maps document every keystroke, decision branch, and system interaction. They capture the microscopic view needed for compliance documentation, technical system design, and complex troubleshooting. They take time to build, but you need them for high-risk processes that demand precision.
6. BPMN models
Business Process Model and Notation (BPMN) uses standardized symbols that software can interpret and execute. This notation helps business analysts and developers speak the same language. If you’re building automated workflows or integrating multiple systems, BPMN provides the precision needed for successful deployment.
7. Cross-functional process maps
Cross-functional maps visualize workflows spanning multiple departments, systems, and locations. They reveal complex dependencies and integration points that simpler maps miss. You need these comprehensive views during major changes or when you’re fixing the entire customer experience.
Essential process mapping symbols and notation
Using consistent symbols means everyone reads your maps the same way. There are dozens of symbols out there, but these core ones handle most situations.
Core symbols every map needs
Every process map starts with four basic symbols:
- Oval (terminal): Marks the start and end points of your process
- Rectangle (process): Shows any step where work gets performed or data changes
- Diamond (decision): Indicates choice points where the process splits based on conditions
- Arrow (flow): Connects steps and shows the sequence of activities
Decision points and gateways
Decision diamonds control the flow of your process based on specific criteria. Simple decisions create yes/no branches, while complex gateways might route work down multiple parallel paths. Map these decision points clearly, and people won’t get confused about which path to take.
Data and document symbols
Processes consume and produce information. Document symbols (wavy rectangles) show where paperwork or files enter the workflow. Database symbols (cylinders) indicate where information gets stored or retrieved. These symbols show where information gets stuck or where teams can’t access what they need.
Try monday work managementChoosing the right processes to map first
To ensure success, start strategically by mapping a few high-impact processes first. A focused approach prevents team burnout and builds momentum for future initiatives. Start with processes that’ll give you quick wins and prove the value to skeptics.
High-impact process characteristics
The best processes to map first have a few things in common. Look for processes that directly impact customer satisfaction, occur frequently enough that small improvements compound quickly, or carry compliance requirements that demand clear documentation.
Processes experiencing obvious pain points make excellent starting points. When teams already recognize problems, they’re more receptive to mapping exercises and subsequent improvements. When one team sees results, others want in.
Quick wins to build momentum
Begin with contained processes that one cooperative team owns end-to-end. Successfully mapping and improving a hiring workflow or purchase approval process demonstrates immediate value. Early wins give you the credibility to tackle bigger, messier processes.
monday work management helps teams achieve these quick wins by providing templates and visual workflow builders that make initial mapping exercises feel manageable rather than overwhelming. Teams can start simple and gradually add complexity as their confidence grows.
Try monday work management6 steps to create process maps that drive results
Drawing boxes and arrows is the easy part. Follow this approach, and your maps will actually get used instead of gathering dust.
Step 1: Define clear boundaries
Every process needs definitive start and end points. Fuzzy boundaries create maps that try to cover everything and end up useless. Define the specific trigger that initiates your process and the concrete outcome that completes it. Clear boundaries keep your mapping project from spiraling out of control.
Step 2: Engage the right stakeholders
Process mapping requires input from three groups: process owners who are accountable for outcomes, performers who execute the work daily, and customers who receive the output. Facilitate workshops where these stakeholders collaborate to capture how work really happens, not how management thinks it happens.
Step 3: Document the current state
Resist the temptation to map the ideal process immediately. First, document reality — including workarounds, informal handoffs, and undocumented steps. This honest look shows you exactly what needs fixing.
Step 4: Identify improvement opportunities
With the current state visible, analyze the flow for waste, delays, and redundancies. Look for steps that add no value, handoffs that consistently cause delays, and decision points that could be automated. Prioritize improvements based on impact and feasibility.
Step 5: Design the optimized future state
Create your improved process map incorporating the identified enhancements. This might include eliminating unnecessary approvals, automating routine decisions, or reorganizing work to reduce handoffs. Balance what’s ideal with what’s actually possible given your tech and how much change your team can handle.
Step 6: Build in performance metrics
Define how you’ll measure process performance. Embed KPIs like cycle time, error rates, and throughput directly into your process design. These metrics show whether your improvements actually work and where to optimize next.
Process mapping best practices for lasting success
Building the map is the easy part — keeping it useful is harder. These practices keep your maps from becoming outdated files nobody opens.
Start with high-level views
Begin with a 30,000-foot view before diving into details. This big-picture view gets everyone aligned before you dive into details. Once you’ve established this foundation, you can selectively add detail where it provides value.
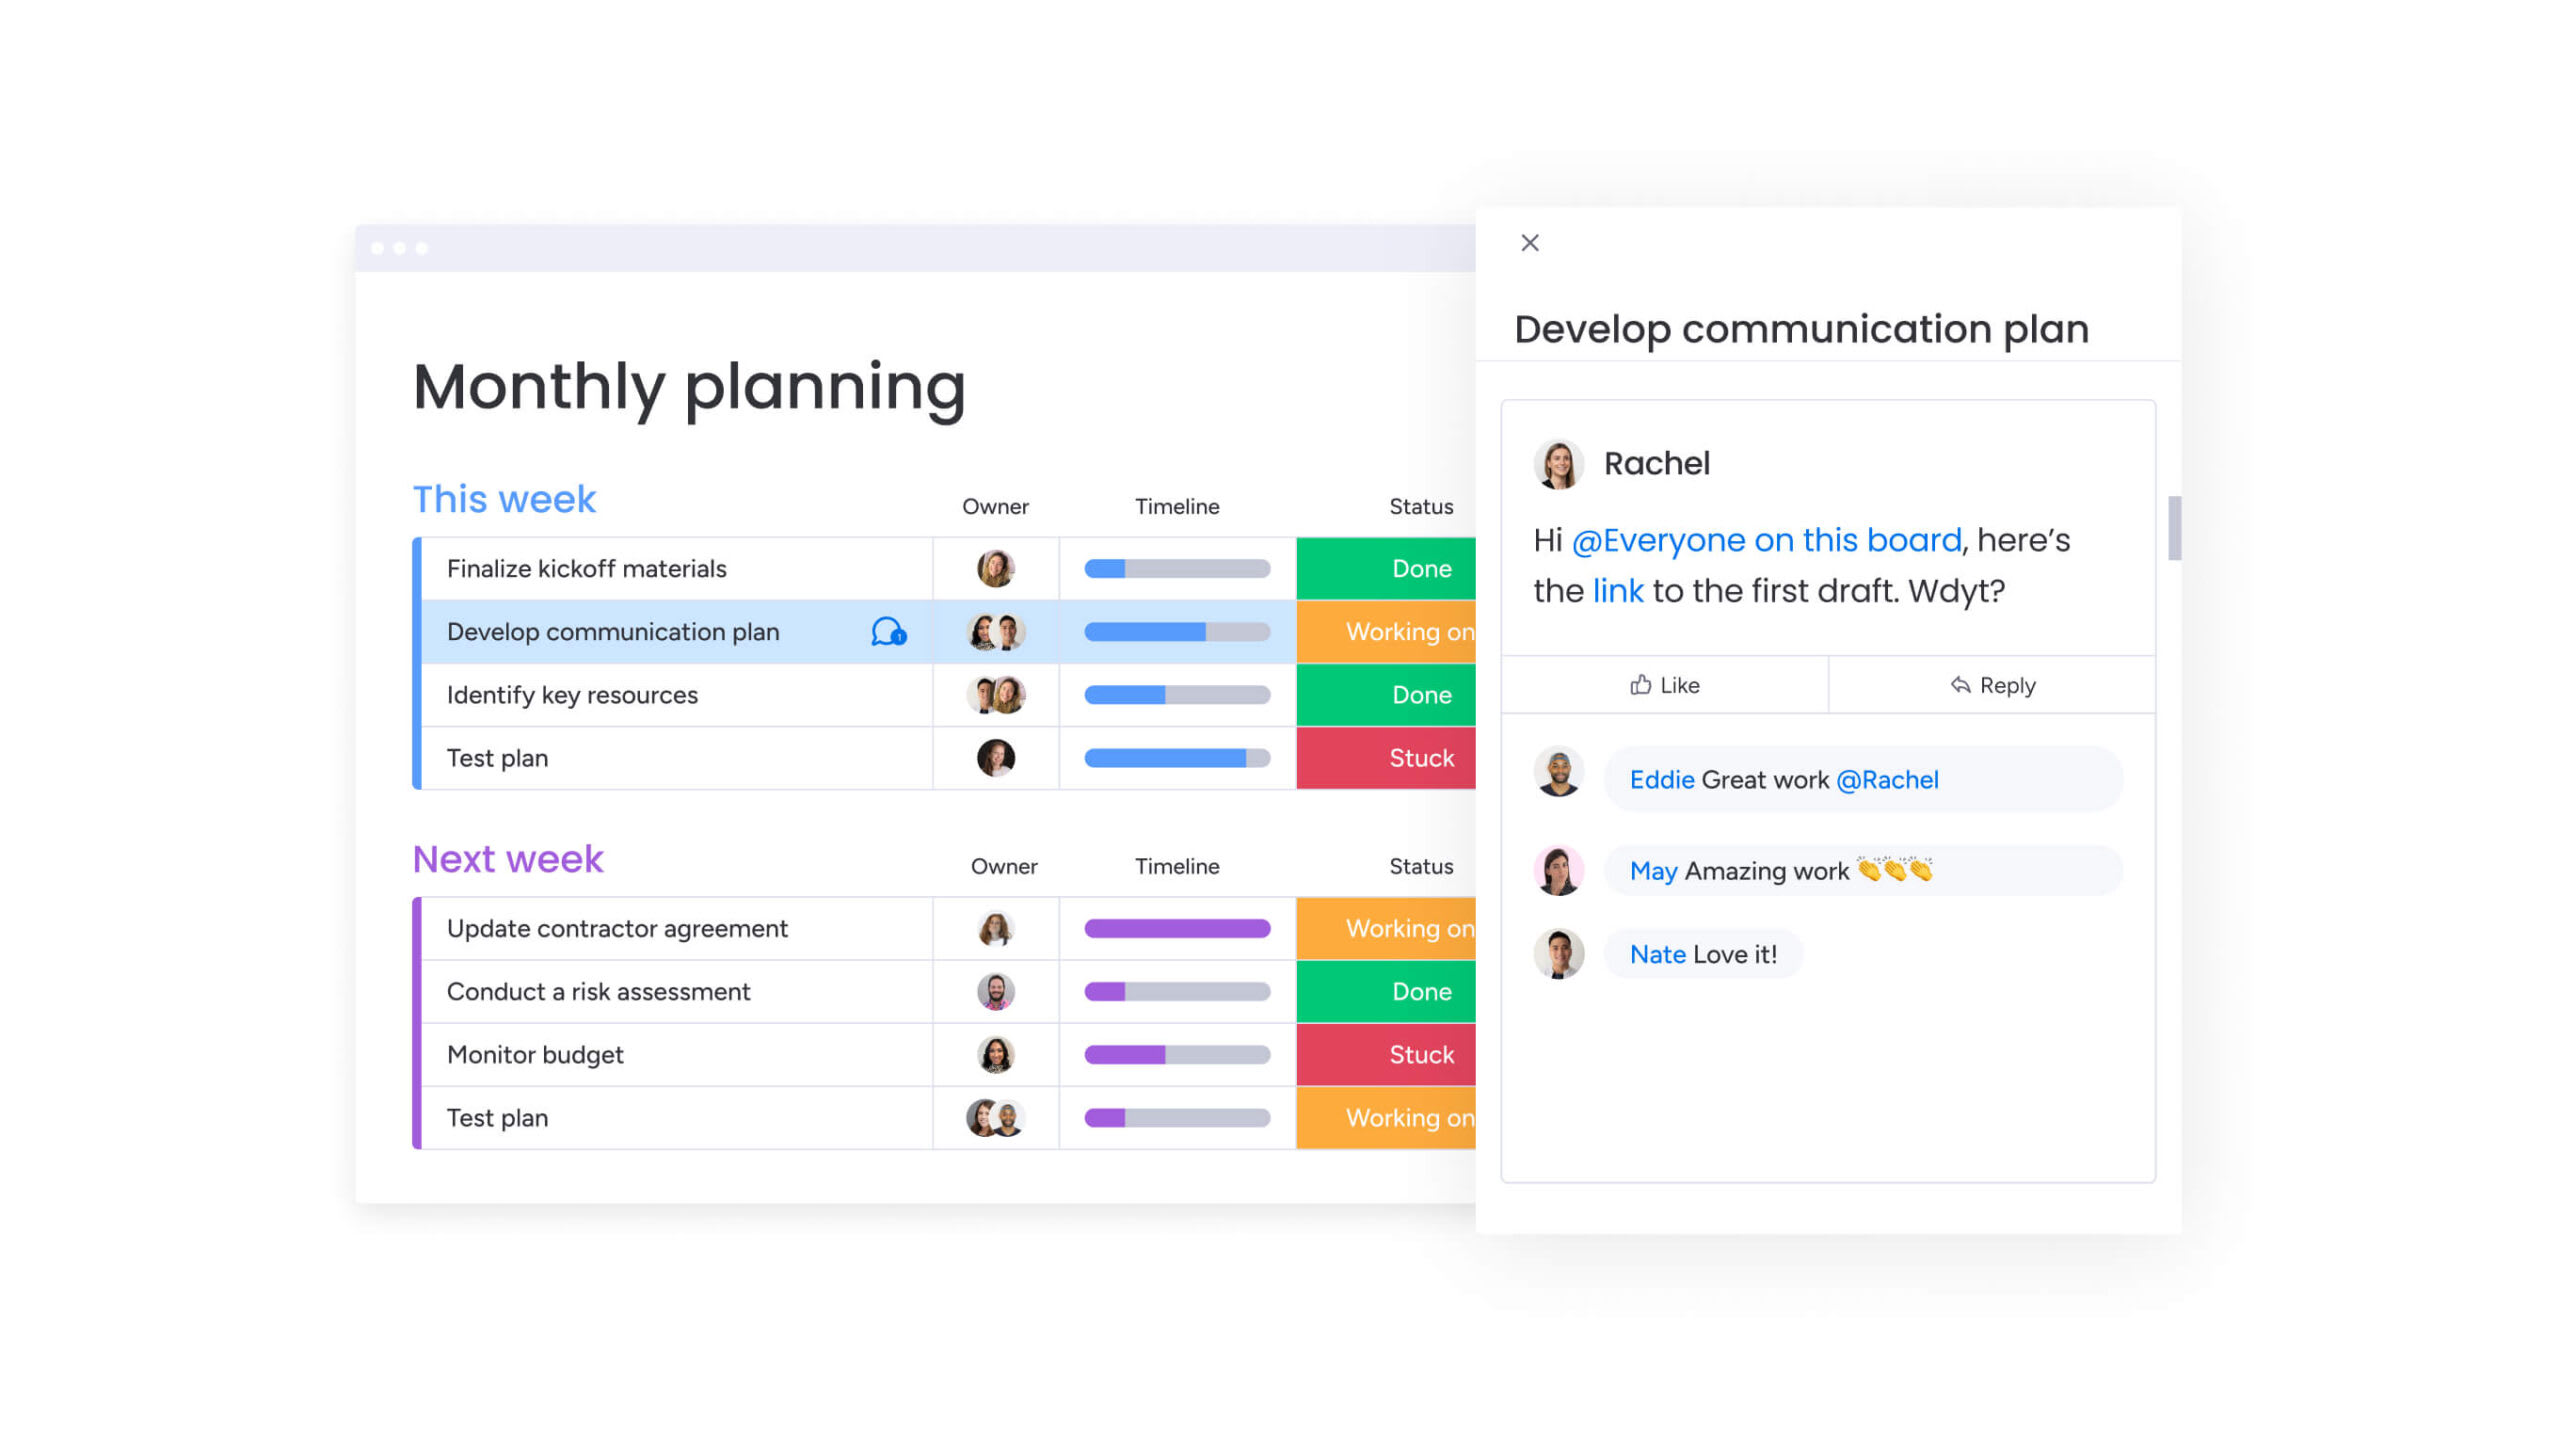
Enable real-time collaboration
Process mapping works best as a team sport. When everyone can contribute at once and see changes in real-time, you get better information and more commitment. Digital collaboration solves the version control mess that comes with traditional docs.
Teams using monday work management can collaborate on process documentation in real-time, with changes instantly visible to all stakeholders. Comments, suggestions, and approvals happen directly within the workflow, maintaining full context and history.
Maintain version control
Processes evolve constantly. Without version control, teams follow old procedures or work from different versions of the same doc. Recent research shows that 79% of redesigns were completed successfully when organizations applied rigorous workflow redesign principles, highlighting the importance of maintaining current process documentation. Set up clear versioning rules and make sure everyone knows where to find the latest version.
Connect maps to daily work
The most effective process maps integrate directly with execution platforms. Rather than existing as separate reference documents, they become part of the actual workflow. This keeps your docs up to date and gives people context right when they need it.
Transform static maps into living workflows with monday work management
Static process maps go stale fast. monday work management transforms them into dynamic workflows that evolve with your business. The platform connects your documentation to actual work, so your mapped processes drive what people do every day.
From documentation to execution
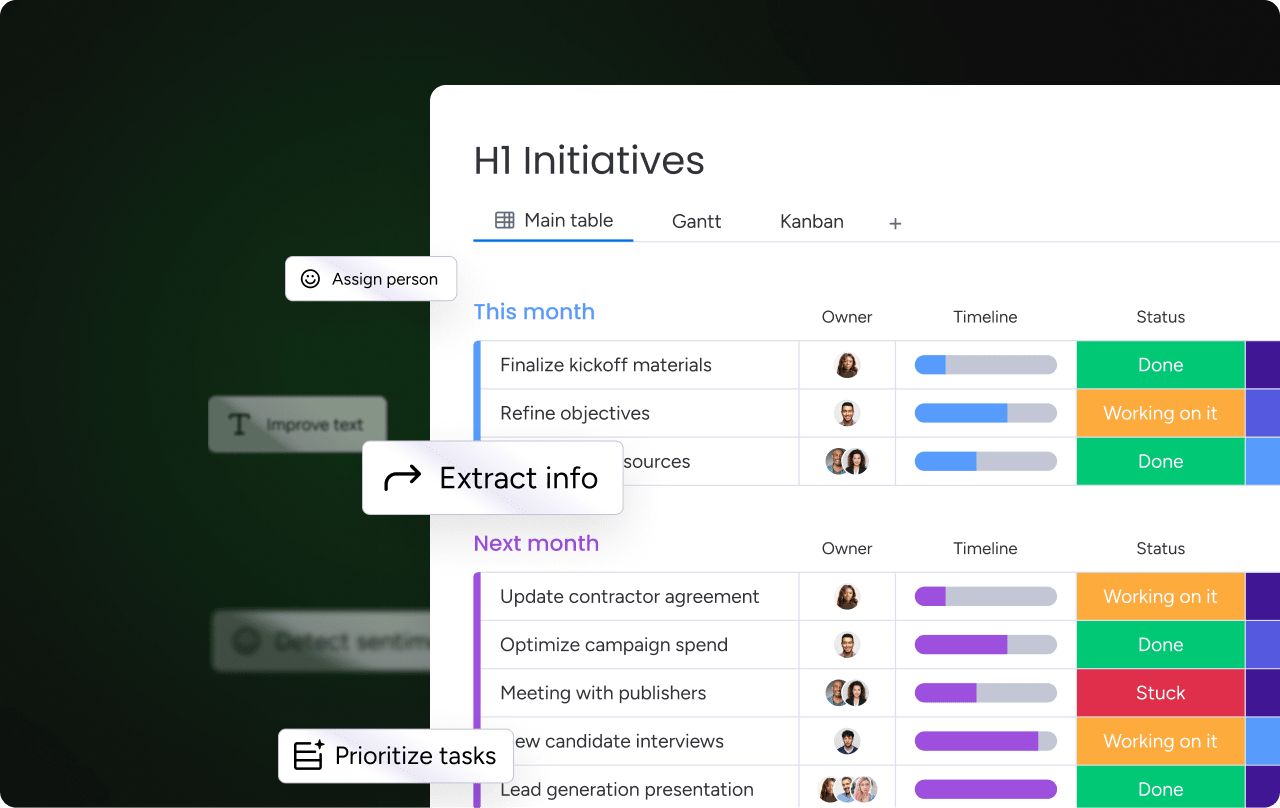
Process maps built on monday work management aren’t just diagrams — they’re operational workflows. Each step becomes a real task with an owner, deadline, and automatic triggers. Update the process, and the workflow updates automatically — no sync issues.
The platform’s visual workflow builder lets you drag and drop process steps, creating executable workflows without coding. Templates provide starting points for common processes, while customization options ensure you can model even the most complex, unique workflows.
AI-powered process intelligence
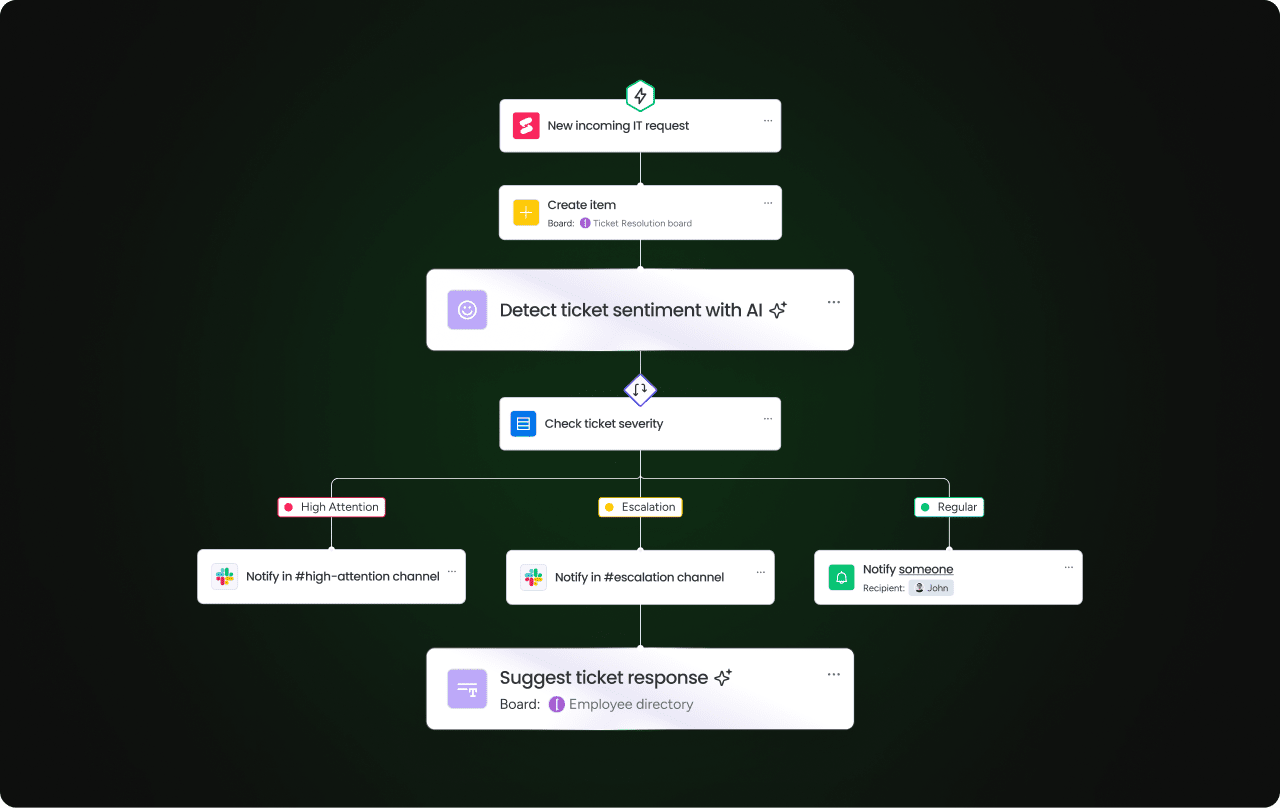
AI capabilities within monday work management take process mapping beyond static documentation. AI Blocks analyze live workflows to identify patterns, suggest optimizations, and automate routine decisions inside the platform.
That shift matters. According to McKinsey’s 2025 State of AI research, 88% of organizations report using AI in at least one business function, yet only 7% have successfully scaled AI across the enterprise. One common barrier: processes that are inconsistent, poorly documented, or difficult to translate into structured rules.
AI Blocks help close that gap. Instead of layering AI on top of fragmented workflows, teams define clear process logic directly within monday work management. The system can categorize incoming requests, extract key information from documents, and route work based on rules you establish. As workflows become structured and visible, AI moves from isolated experimentation to repeatable execution.
Cross-functional visibility and governance
Enterprise process management requires two things: cross-department visibility and structured governance. monday work management delivers both within a connected workspace.
Leaders gain organization-wide insight through customizable dashboards that surface process performance in real time. Boards, workflows, and automations roll up into high-level views, making it easier to track progress, identify bottlenecks, and align teams around shared priorities.
Governance remains intact through role-based permissions and detailed activity logs. Admins can control who builds, edits, or automates workflows, while audit trails track changes across boards to support compliance and accountability.
For portfolio-level oversight, Portfolio Risk Insights analyzes patterns across projects and mapped workflows to flag potential risks early. Instead of reacting to missed deadlines or stalled initiatives, leaders can address small deviations before they escalate into larger operational issues.
Turn process mapping into competitive advantage
Process mapping changes how you work — less firefighting, more fixing things before they break. Document, visualize, and improve your workflows, and you’ll build advantages that grow stronger over time.
The organizations that thrive in today’s environment don’t just map their processes — they make them intelligent, adaptive, and connected to real-time execution. When documentation connects to daily work, improvements stick and deliver real results.
Ready to transform your static processes into dynamic workflows? monday work management provides the platform to turn your process maps into living, breathing operational systems that evolve with your business needs.
Try monday work managementFAQs
What's the difference between process mapping and process documentation?
The difference between process mapping and process documentation lies in their format and focus. Process mapping uses symbols and diagrams to visually show how work moves through steps, decisions, and handoffs. Process documentation is broader and includes written procedures, policies, and detailed instructions that supplement the visual map. Process documentation includes written procedures, policies, and instructions — often with detailed text, screenshots, and explanations that go beyond visual flow.
How detailed should a process map be?
How detailed you get depends on who's using the map and why. Executive-level maps need high-level overviews showing major phases and outcomes. Training materials require step-by-step detail including specific actions and decision criteria. Compliance documentation demands comprehensive coverage of every possible path and exception.
Can process maps track real-time performance?
Static process maps can't track performance, but digital maps on platforms like monday work management monitor metrics in real-time. These living workflows track cycle times, identify bottlenecks as they occur, and provide dashboards showing current process health and performance trends.
How often should process maps be updated?
Review your process maps at least quarterly, and update them right away when something major changes. Update your maps when you implement new tech, restructure teams, face regulatory changes, or when metrics show the process isn't working.
What makes a process map AI-ready?
AI-ready process maps clearly define data inputs, decision logic, and exception handling paths. They spell out what data the AI needs, set clear rules for automated decisions, and define when humans need to step in.
How do you manage process maps at enterprise scale?
At enterprise scale, you need centralized governance, standard notation, and systems that talk to each other. You need version control for hundreds of processes, role-based access, and platforms that stay consistent while letting departments customize what they need. Integration lets your process maps connect with your existing enterprise systems.