
Cost breakdown structure is one of the most reliable ways to bring clarity to project finances. By mapping every cost category — from labor and materials to equipment and contingency — teams get a transparent picture of where their budget is going and what’s driving spend at each stage.
For many project managers, the challenge isn’t recognizing the importance of cost control but knowing how to structure costs in a way that’s accurate, traceable, and easy to manage. A well-built cost breakdown structure solves that. It turns broad estimates into organized, actionable budget components that support better forecasting and more confident decision-making.
This guide explores what makes a strong CBS, how to break down costs effectively, which estimation methods work best, and how a CBS connects to a work breakdown structure. We will also take you through a real example and highlight how modern platforms make it easier to track budgets in real time.
Key takeaways
-
Understand the basics: learn what a cost breakdown structure is and why it’s essential for accurate project budgeting.
-
Break down costs clearly: see how to organize labor, materials, equipment, and contingency into a structured hierarchy.
-
Estimate smarter: explore practical techniques for predicting costs with greater accuracy.
-
Compare key frameworks: understand the difference between a cost breakdown structure and a work breakdown structure.
-
Manage budgets dynamically: use monday.com to track budget targets, actuals, and variances in real time.
What is a cost breakdown structure (CBS)?
A cost breakdown structure is a hierarchical map of every cost required to deliver a project. It breaks the total budget into smaller, traceable components so teams can understand where money is allocated, how each task contributes to overall spend, and where potential overruns may occur.
A well-structured CBS typically:
-
Organizes costs by phase or task: aligns expenses directly to the work being delivered.
-
Creates a clear hierarchy: groups high-level categories into detailed sub-costs for better visibility.
-
Improves estimating: makes it easier to assign accurate values to each part of the project.
-
Enables ongoing tracking: supports real-time monitoring of actuals versus planned budget.
At its core, a CBS provides the financial structure that keeps projects predictable, measurable, and aligned with their approved budget.
Is a cost breakdown structure essential for project success?
In most cases a CBS plays a crucial role in delivering projects on budget because it removes ambiguity around where money is being spent and why. Without it, teams often rely on broad estimates, scattered spreadsheets, and assumptions that make it hard to stay financially on track.
A CBS becomes essential when teams need to:
-
Build an accurate budget from the start: it provides the structure needed to set realistic financial expectations.
-
Stay ahead of overspending: clear cost visibility makes it easier to spot problems before they affect delivery.
-
Justify decisions to stakeholders: leaders get a transparent view of cost drivers, trade-offs, and resource needs.
-
Keep scope and finances aligned: as work evolves, the CBS helps assess how changes impact the overall budget.
Some small or routine projects may get by without a detailed CBS, but any initiative with multiple phases, shared resources, or tight constraints benefits significantly from having one in place.
What's included in a cost breakdown structure?
A CBS brings structure to your budget by grouping every project expense into clear, manageable categories. While the exact breakdown varies by industry, most cost structures include the following components:
Direct costs
These are the expenses tied to specific tasks or deliverables. Examples include software licenses for a development sprint, materials for a build phase, or contractor fees for a defined piece of work.
Indirect costs (overhead)
Indirect costs support the project but aren’t linked to one activity. Office rent, utilities, administrative salaries, and general operational expenses usually fall here. Many teams allocate these as a percentage of direct costs to keep budgeting consistent.
Labor costs
This covers wages, salaries, benefits, and any additional compensation for everyone contributing to the project — from project managers to specialists and contractors.
Material and equipment costs
Any physical materials, tools, rentals, or machinery needed to complete the work fit into this category. These often make up a large portion of budgets for engineering, production, or construction projects.
Contingency reserves
Every project carries uncertainty, so most budgets include a financial contingency for unexpected expenses. Many teams set aside around 5–10% of total estimated costs to absorb risks without derailing the plan.
How to create a cost breakdown structure
Building a CBS is easier when you approach it step by step. The goal here is to turn broad project requirements into a clear financial structure that’s easy to track and update as work progresses.
Step 1: define your project scope
Start by confirming the full scope of work. Most teams do this using a work breakdown structure because it outlines every deliverable, phase, and task. The more complete your scope, the more accurate your cost breakdown will be.
Step 2: list cost components for each task
Once the scope is set, identify every cost tied to the work. This includes labor, materials, equipment, external services, software, and any other expenses. Aim for a level of detail that helps you budget confidently without overcomplicating the structure.
Step 3: choose your estimation method
Different projects call for different estimating techniques.
-
Analogous estimating: uses data from past projects with similar characteristics.
-
Parametric estimating: applies cost-per-unit or other measurable variables to predict totals.
-
Bottom-up estimating: evaluates each task individually and produces the most precise budget, though it’s more time-intensive.
Using a mix of methods is common, especially when parts of a project are more defined than others.
Step 4: roll up your totals and add contingency
After estimating each component, combine the totals to build your full budget. This is also the stage to add contingency — a buffer that protects your project from unknowns, price shifts, or scope adjustments.
Step 5: track, refine, and adjust in real time
A CBS shouldn’t stay static. As work progresses, revisit your estimates, compare actuals against the plan, and adjust where needed. Teams often move this process into a work management platform like monday.com so costs are easier to monitor, share, and update across stakeholders.
Cost breakdown structure examples
Seeing a CBS in action makes it much easier to understand how the structure works across different types of projects. Here are a few simple examples that show how costs can be grouped and broken down in different industries.
Example 1: software feature release
A product team planning a new feature might break its costs into categories like:
-
Design and research: UX/UI design hours, customer interviews, prototyping tools.
-
Development: developer hours, API costs, testing environments.
-
Quality assurance: test plans, automated testing tools, bug-fixing cycles.
-
Launch support: documentation, internal enablement, rollout communications.
This CBS helps the team compare initial estimates to actual development effort, especially when feature scope changes.
Example 2: construction renovation project
A renovation project usually has more physical cost components, so the CBS might include:
-
Site preparation: inspections, permits, demolition work.
-
Materials: lumber, fixtures, flooring, paint, hardware.
-
Equipment: machinery rentals, safety gear, tools.
-
Labor: contractors, electricians, plumbers, project management oversight.
-
Contingency: a buffer for price fluctuations or unexpected structural issues.
Breaking this out gives the project owner transparency into where the budget is going and which areas carry the most risk.
Example 3: event planning
Event planners often rely on a CBS to keep spending predictable:
-
Venue and logistics: room rental, security, cleaning, signage.
-
Production: lighting, sound system, staging, livestreaming.
-
Marketing and promotion: ads, printed materials, creative assets.
-
Catering: food, beverages, equipment rental, staff.
-
Talent and programming: speakers, entertainment, travel.
This level of detail gives the team a clear view of high-cost areas and helps guide decisions when budgets shift.
Example 4: internal training program
Even smaller internal initiatives benefit from a CBS:
-
Content creation: instructional design, editing, templates.
-
Delivery: facilitator hours, room booking, virtual tools.
-
Materials: workbooks, slides, software licenses.
-
Evaluation: surveys, follow-up sessions, reporting.
This structure keeps training programs consistent from cycle to cycle.
Cost breakdown structure (CBS) vs work breakdown structure (WBS)
Because the names sound similar, CBS and WBS are often mixed up — but they serve two very different purposes. One helps you understand the work you’re delivering, while the other helps you understand the cost of delivering it.
A simple way to think about the relationship is that a WBS outlines everything the team needs to do, and the CBS attaches a price tag to each part of that work.
WBS: focuses on the work
A work breakdown structure maps out the full scope of the project by breaking it into phases, deliverables, and tasks. It answers questions like:
-
What needs to be done?
-
Who is responsible for each piece?
-
How does the project fit together?
It’s all about clarity of scope and ensuring nothing falls through the cracks.
CBS: focuses on the cost
A cost breakdown structure uses the WBS as its foundation but shifts the lens to budgeting. It answers questions such as:
-
What will each task cost?
-
How does spend accumulate across phases?
-
Where are the biggest financial risks?
Instead of describing the work itself, it shows the financial impact of delivering it.
How they work together
Most teams build the WBS first to define the scope. Once the work is clear, they use it to build a CBS that assigns costs to each component. Together, the two structures give teams a complete picture — what needs to be done and what it will take financially to deliver it.
Transform your CBS into a real-time budget with monday.com
Spreadsheets can work for early budgeting, but they tend to break down once more people get involved, versions start multiplying, and costs shift during delivery. A dynamic platform makes it easier to keep your CBS accurate, visible, and aligned with the real work happening day to day: and that’s where monday.com fits in.
Build a structured, flexible CBS
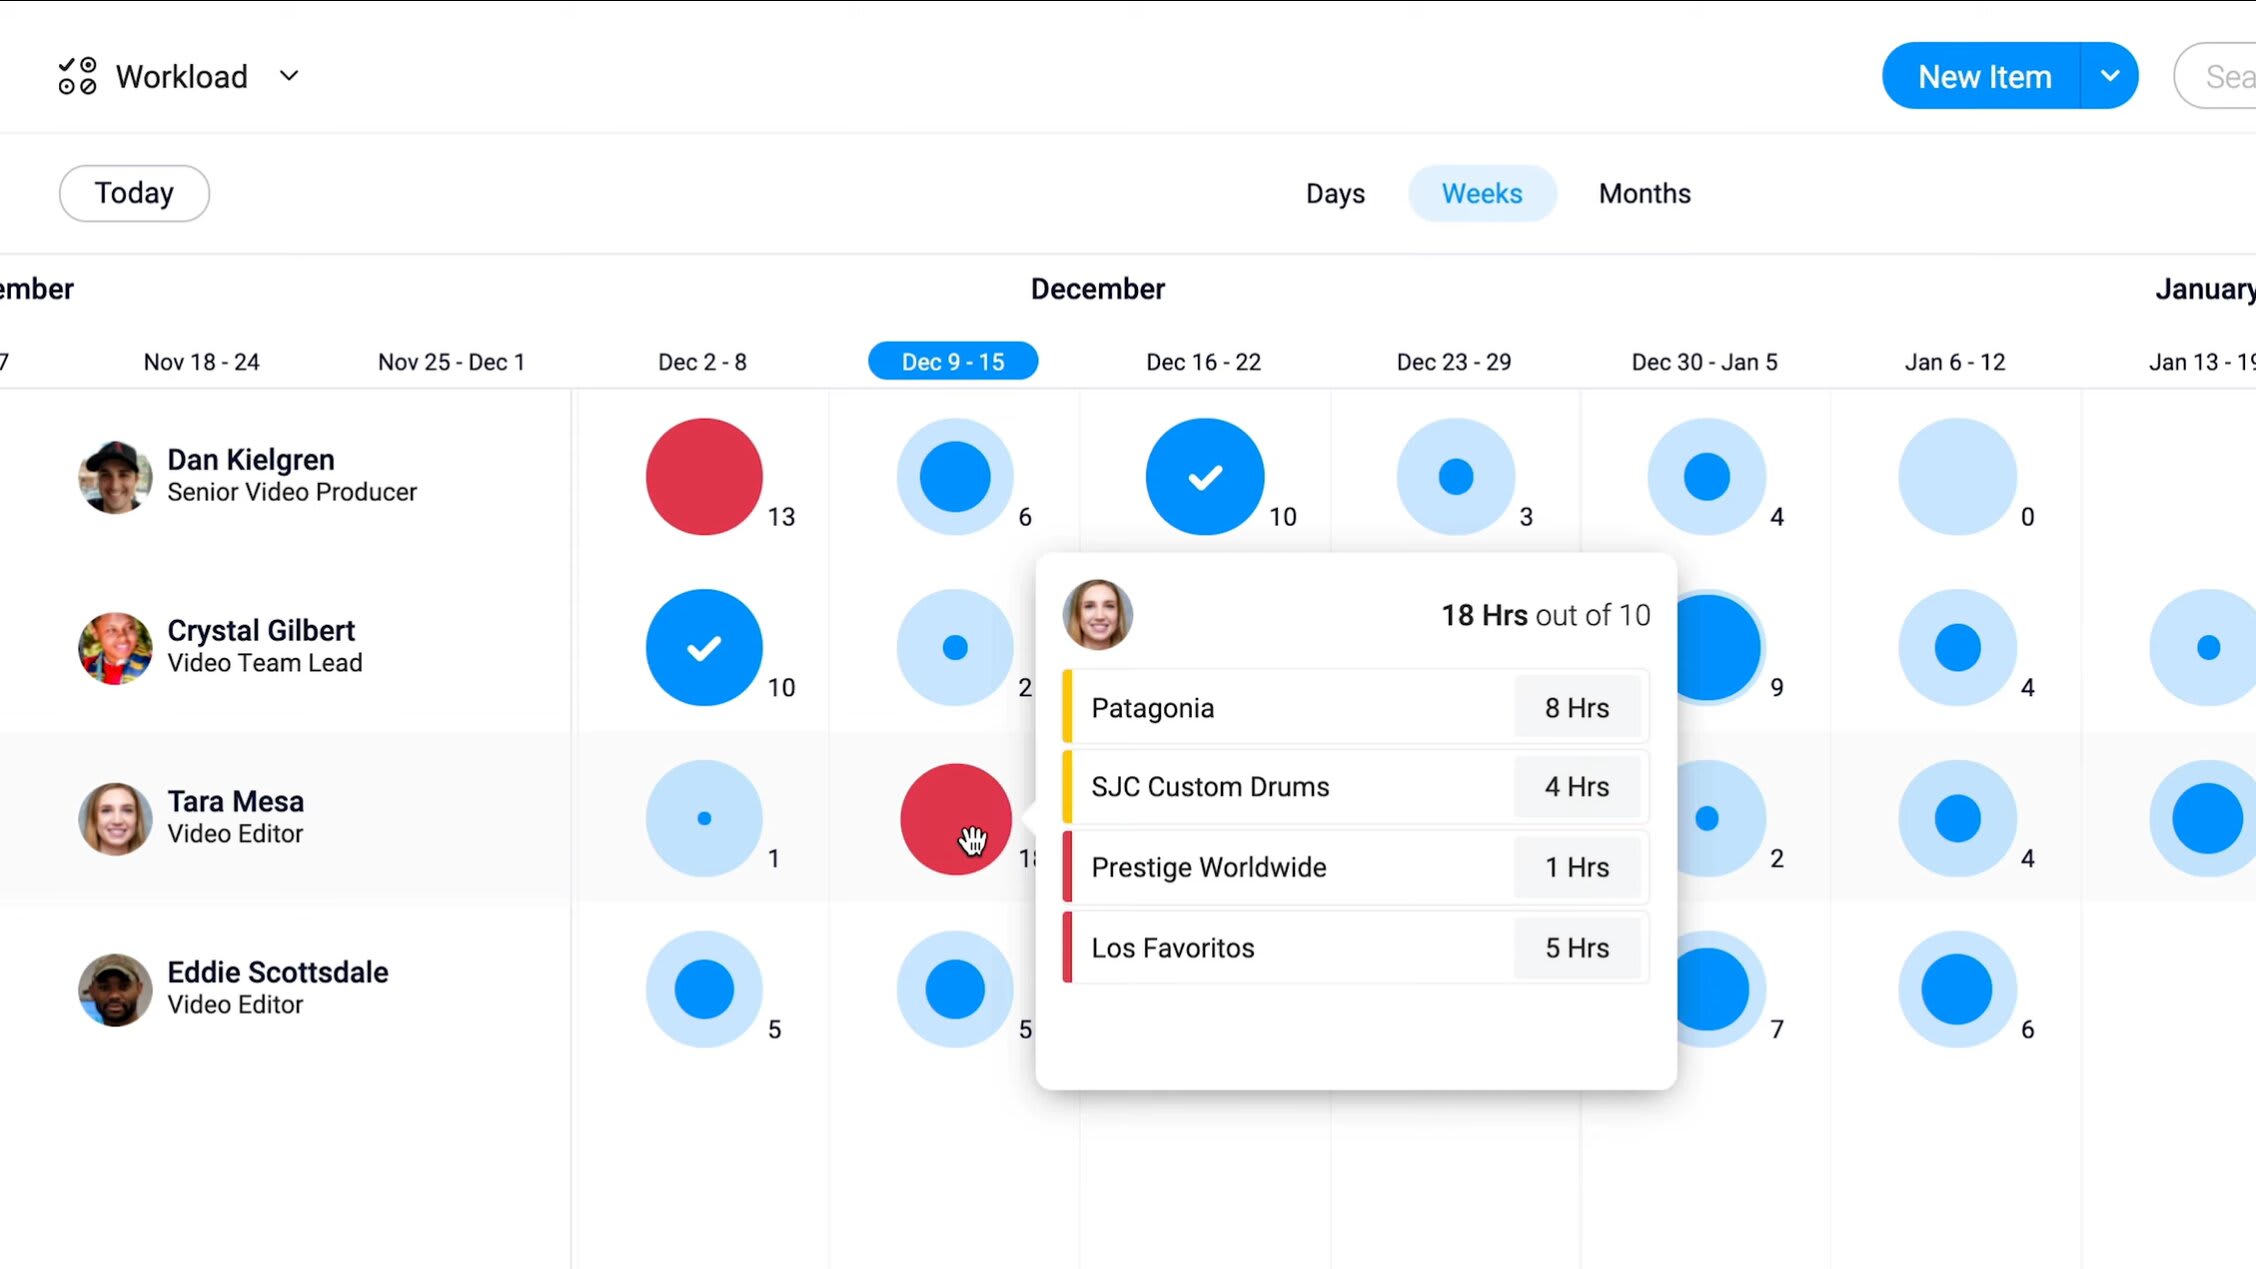
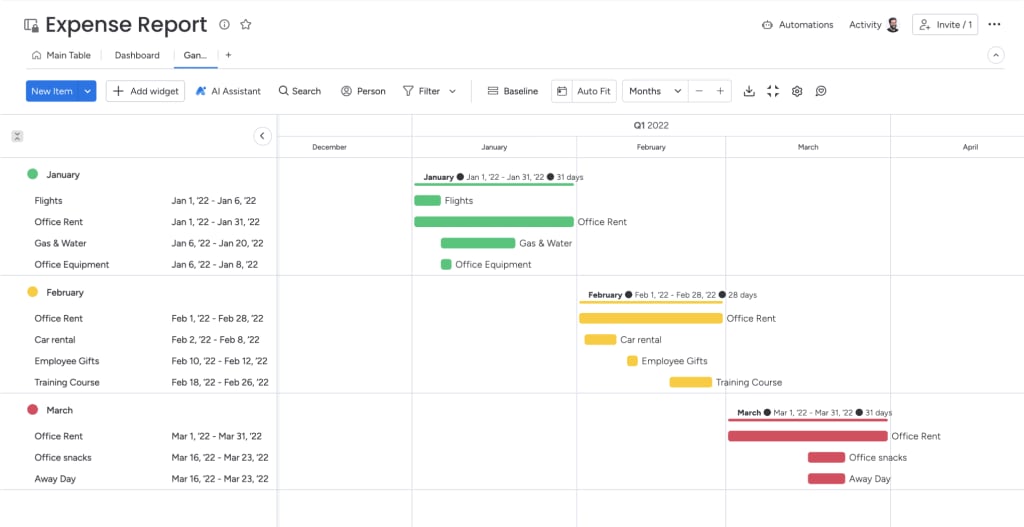
A dedicated project board lets you map each task or deliverable from your WBS and pair it with the cost categories that matter most. Columns for budget, actual spend, labor hours, materials, or equipment keep everything organized without juggling multiple files.
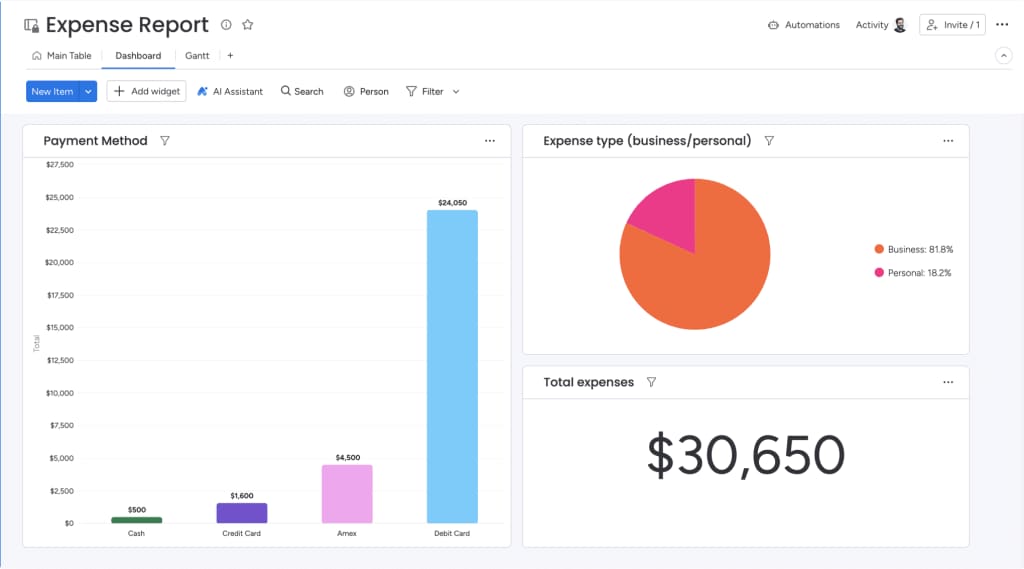
Track budget versus actuals automatically
The Numbers Column and Formula Column handle calculations for you. Totals, variances, and remaining budget update the moment someone logs a new cost, removing the need to hunt through formulas or reconcile scattered spreadsheets.
Stay ahead of overspending with automations
Automations act like real-time guardrails for your CBS.
-
When actual spend exceeds the target: the right people get notified instantly.
-
When statuses change: cost fields update or stakeholders receive alerts.
This reduces manual oversight and makes budget control more proactive.
Share clear financial visibility with stakeholders
Dashboards consolidate data from multiple project boards so leaders can see total spend, high-cost areas, and overall financial health at a glance. It’s a simple way to align teams and streamline budget discussions.
Keep cost tracking connected to the work
Because tasks, files, updates, and financial data live in one place, teams can see how costs relate to progress. This makes it easier to understand why expenses shift, what’s driving the budget, and where adjustments might be needed.
monday.com turns a CBS into a living system — one that updates as work happens, supports faster decisions, and gives teams confidence in their financial planning.
Frequently asked questions
What is the difference between a Cost Breakdown Structure (CBS) and a Work Breakdown Structure (WBS)?
A Work Breakdown Structure (WBS) outlines all the tasks and deliverables required to complete a project-it defines the 'what.' A Cost Breakdown Structure (CBS) assigns a cost to each of those tasks and deliverables-it defines the 'how much.' You typically create the WBS first and then use it as a foundation to build your CBS.
What are the main cost categories in a CBS?
The main cost categories in a CBS are direct costs (expenses tied to a specific task), indirect costs (general overhead like rent), labor costs (salaries and wages), material and equipment costs, and contingency reserves (a budget buffer for unexpected expenses).
How do you calculate contingency costs for a project?
Contingency costs are typically calculated as a percentage of the total estimated project cost. A common practice is to set aside 5% to 10% of the total budget as a contingency reserve. This fund is used to cover unforeseen risks or changes that could impact the project's finances.
What is the best software for creating a cost breakdown structure?
While spreadsheets like Excel can work for simple projects, the best software for a cost breakdown structure is a comprehensive Work OS like monday.com. Unlike static spreadsheets, monday.com allows you to track budgets in real-time, automate budget alerts, visualize spending with dashboards, and collaborate with your team all in one place, giving you much greater control and visibility.